
Choose Microsoft Netmeeting (if you have earlier versions) and click on Add/Remove. The uninstall process will begin and click on Yes when prompted to complete uninstallation process.
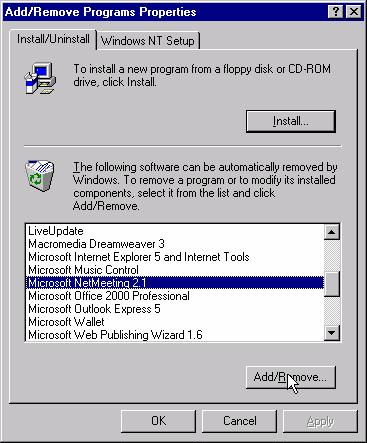
Choose MeetingPoint (earlier versions, if any) in the dialog box and click on Add/Remove. The uninstall process will begin and click on Yes when prompted to complete uninstallation process.

At the end of the uninstall process, restart the computer.
Install MeetingPoing 4.1: Close all open applications. Insert the MeetingPoint CD-ROM in the CD-ROM drive. (In some cases of Windows 95/98, MSDun version 1.3 / Winsock 2.0 is required prior to installing MeetingPoint 4.1 and in case of NT, Service Pack 3 is required.) Microsoft NetMeeting is installed prior to installation of MeetingPoint. (If the installation utility does not appear, select and run the install application file from the CDROM.)

Click Install MeetingPoint 4.1 to start the installation process.

Click Next on the welcome screen.


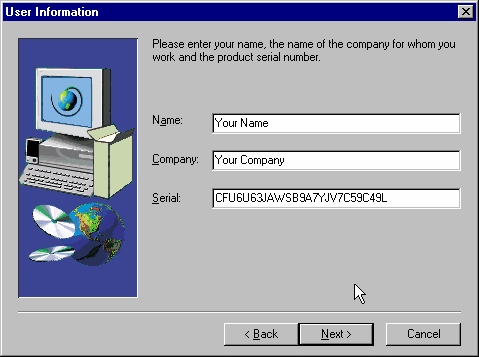
The product license number appears automatically from the serial box. Enter your name and company you are affiliated to in the Name and Company box shown in the dialog box.On clicking Next, the software license agreement appears. Please read the agreeement carefully before clicking yes to continue the installation process.
In the next dialog box choose the type of setup you would like to install in your computer. Typical setup process is recommended. Click Next.If you have chosen typical or compact installation, the Start Copying Files dialog box appears. If you have seleced custom, the select components dialog box appears. Select the components that you want to install and then select Next to proceed to start copying files. In the Start Copying Files dialog box, check and confirm your settings. To change your incorrect settings, click Back , otherwise click Next to continue.The progress in the installation process is shown.


At the end of installation, the Setup Complete dialog box appears. To start MeetingPoint for the first time, you must restart your computer. Click Finish to implement your selection and close the installation program.

Possible errors encountered during installation process:


Configure MeetingPoint
The following procedure is to set up a standard Meeting Point system. Any on the configuration details can be changed whenever the system is on. To change the configuration right click anywhere in the Conference Panel and then click Configuration.
In the windows desktop, click Start, point to Programs and then click MeetingPoint 4.1.The configuration wizard appears and guides you through the required stages and requests relevent information for normal operation of MeetingPoint. Click Next to continue from the welcome dialog box.
In the user name information section, type your First name, Last name, Company name and E-mail address. In the Dialing infomation section, click Country that you are in, type your area code and type appropriate digits for dialing an outside line (External), a long distance call or an International call. In our case (using Escort 25) we use leave the Dialing information section blank.

In the H.323 dialog box, enter the information about the connected Local Area Network (LAN). Go to the cavner webpage (http://www.cavner.org/) and go to your account information in the dialing directory. From the directory get your User Alias and User Number and enter it in the H.323 dialog box in the configuration setup. To get your Gatekeeper IP Address look up the corresponding Gatekeeper IP address for your zone alias entry (from dialing directory) in the VideNet zone list at http://www.cavner.org/videnet/sites/site_info.htm (for UNC-CH users, it is 152.2.2.199). Do not leave the address blank because the computer cannot register with gatekeeper without this information.
Note: If you do not have an ViDeNet account yet, you can submit request for one by filling out the form at http://www.cavner.org/videnet_main_directory/submit.html
Note: Users of netcall1 can refer to http://www.cavner.org/videnet_main_directory/dial_inst.htm for dialing additional information. Users of netcall2 can refer to dialing instructions at http://www.cavner.org/netcall2/dial_inst_with_mcu.htm for additional information.

Users of VideNet and LSVNP do not use On-Line Directory support.

Choose the appropriate camera setting for your desktop camera.

Click Next to continue. Check your configuration in the confirmation dialog box to complete the configuration process.
To change the configuration after set-up, right click VCON taskbar (shown below) and click on configuration.
![]()
To change the properties of VCON, right click VCON taskbar and click on properties. Click on General tab to see the settings.
In the Data Sharing Settings, click on button to enable NetMeeting Data Application. For more information on data sharing see http://www.unc.edu/cit/h.323/sharing.html.

To set your VCON to auto answer your incoming LAN video calls. Check Auto Answer option in the Auto Answer tab in the properties.

This completes the installation and configuring the VCON Video-conferencing system.
To
learn to use the VCON for video/audio conferencing see (LSVNP/Netcall1):
http://www.cavner.org/videnet/dial.
For netcall2 see :
http://www.cavner.org/netcall2/dial_inst_with_mcu.htm
.