UniverCD-Banner

 Home TOC Prev Next Help Search CIOSearch


Table of Contents

Troubleshooting WAN Connectivity

Troubleshooting WAN Connectivity


This chapter presents symptoms and problems associated with wide-area network (WAN) connectivity.

This chapter consists of the following sections:

Each symptom module is divided into the following sections:

X.25 WAN Router Initial Installation Scenario

A common problem when bringing new internetworking nodes online is that systems on one side of the new node often are unable to communicate with systems on the other side. The problem scenario that follows explores this kind of situation in the context of a private X.25 WAN. In this case, several problems are uncovered during troubleshooting before a final resolution is achieved.

Symptoms

No traffic of any kind can pass through a newly installed router used to interconnect an Ethernet-based network segment with a private X.25 WAN. Local-area networks (LANs) previously interconnected with the X.25 WAN continue to communicate without disruption of service. However, users trying to make connections cannot get through to resources on the new segment.

Environment Description

Figure 12-1 illustrates a map of an X.25 WAN. The following list summarizes relevant elements of this internetworking environment: Figure 12-1 X.25 WAN Connectivity Scenario Map

s1239a.gif

Diagnosing and Isolating Problem Causes

Given this situation, the following problems are the best candidates for interconnection failure: Next, eliminate each potential cause as a problem source and then test the network to determine whether it is operational. The following discussion works through the problem isolation process.

Isolating Serial Hardware and Media Problems

The following procedure illustrates the process of isolating hardware-related problems:
Step 1 Use the show version EXEC command to determine the condition of the router. Figure 12-2 illustrates the typical output that the system returns when interfaces are minimally operational, and the system can communicate with them. In this case, the interface of interest is associated with an MCI controller.
Figure 12-2 show version Command Output

s3308.gif

Step 2 In addition to the basic information provided in the show version output, use the show controllers EXEC command to examine the types of appliques on a router and the status of the appliques. Figure 12-3 illustrates an example output of the show controllers mci EXEC command. In this case, the environment requires a DTE applique to attach the router to a CSU/DSU device. In contrast, a data circuit-terminating equipment (DCE) applique typically would be required if the router were connecting directly to a host (DTE interface). Figure 12-4 illustrates an example output of the show controllers cbus (Cisco 7000) EXEC command. Figure 12-5 illustrates an example output of the show controllers EXEC command (Cisco 2500, Cisco 4000).
Figure 12-3 show controllers mci Command Output

s2425.gif

Figure 12-4 Show controllers cbus Command Output

s3395.gif

Figure 12-5 Show Controllers Command Output (Cisco 2500, Cisco 4000)

s3396.gif

Step 3 Next, determine whether the interface is operational using the show interfaces serial EXEC command. Figure 12-6 illustrates the output from this command, the first line of which indicates that the serial interface and line protocol are down. These symptoms suggest a router hardware problem or a cabling problem. If the output specifies the line is down, the most likely cause is no Carrier Detect. In new installations, a cabling error is most likely. However, you should check both possibilities.

If the command output indicates that line is up and protocol is down, the likely causes are either that the switch is down, or the device is operating in the correct mode. For example, the device might be operating as an X.25-DCE when it should be operating as an X.25. Consult with your X.25 provider to learn whether the device should be operating as X.25-DCE or X.25 DTE.

Note In general, when using X.25, you cannot ping your own interface.

Figure 12-6 show interfaces serial Command Output Indicating a Possible Wrong Cable or Disabled CD

s3306.gif

Step 4 The next step is to check the hardware. Specific tests to determine whether the hardware is operating normally depend on the system type. For instance, you would inspect the applique LEDs on an AGS+, but with an IGS, you would attach a breakout box to the serial port and check the breakout box status LEDs. For other devices, verify that the Carrier Detect is functioning by using the show interface command.

For general information about interpreting hardware LEDs and other diagnostics, refer to the "Troubleshooting Router Startup Problems" chapter. For specific information, refer to your hardware installation and maintenance documentation.
In this case, assume that the router hardware is operational, but that the transmit clock (obtained from the CSU/DSU) is not active. The cable is the most likely problem candidate.
Step 5 To determine whether it is the cable from the modem to the router or from the modem to the switch, configure the CSU/DSU to operate in local loop mode. This mode terminates use of the line clock (from the T1 service) and forces the CSU/DSU to use the local clock.


Note A loopback test should be performed using HDLC mode. X.25 does not support loopbacks.

Step 6 Next, use the show interfaces serial EXEC command to inspect the interface status. If the line remains down, a bad cable connection is extremely likely.

To remedy this problem, replace the cable and inspect the interface. Repeat the show interfaces serial command and assume that you see the output shown in Figure 12-7. The first line of the output indicates that the interface is operational and that the cable is working properly.
Figure 12-7 show interfaces serial Command Output Indicating That Link Is Up after a Cable Swap

s3307.gif

For more information about troubleshooting serial connections, see the "Troubleshooting Serial Line Problems" chapter.

Isolating Interface, LAN, and Local Host Configuration Problems

At this point, hardware problems associated with the serial connection to the X.25 WAN have been eliminated; however, traffic is still unable to get through Router-New.

Use the following procedure to determine if there is a problem with the LAN interface, the LAN in general, or network hosts:

Step 1 First determine the status of the LAN interface, the LAN media, and the resources on the LAN. Use the show interfaces command to inspect the condition of the interface and determine whether it is communicating with devices on the Ethernet. Figure 12-8 illustrates the output from the show interfaces ethernet EXEC command. In this case, the interface is alive and properly connected.
Figure 12-8 show interfaces ethernet Command Output Indicating an Operational Interface

s3386.gif

Step 2 The output in Figure 12-8 indicates that the interface is operational and sees traffic on the network. However, the output does not indicate whether the router is able to communicate with specific end nodes on the Ethernet or whether the host configuration allows the host to communicate with the router. To determine whether the host can reach the router, use the ping and clear commands to test connectivity with the UNIX end system.

First, use the ping privileged EXEC command to verify that the router can communicate with each host on the local Ethernet. Figure 12-9 illustrates a successful acknowledgment (Echo Reply) to the Internet Control Message Protocol (ICMP) Echo Request (ping).
Figure 12-9 Successful First ping Communication from Router-New to Target Host

s2429.gif

Step 3 Step 2 verified that the router is able to communicate with a specific host. However, to verify that the host configuration is correctly specified, ping the router from the host.
Step 4 Next, use the clear arp-cache privileged EXEC command on the router to clear the Address Resolution Protocol (ARP) cache, and ping from the router to the host again. Figure 12-10 illustrates the successful ping transmission and acknowledgment.
Figure 12-10 Transmission of Second ping Communication to Target Host after Clearing ARP Cache

s2430.gif Figure 12-11 and Figure 12-12 illustrate the effect of the ping exchange on the ARP cache of Router-New (after the clear arp-cache command was executed). Figure 12-11 illustrates that before the ping transmission, the ARP cache does not include the target host. After the ping, the ARP entry for the host is included in the ARP cache for Router-New. (See Figure 12-12.)
In the second ping exchange (refer to Figure 12-10), only 80 percent of the returns are successful. This is the expected behavior. Because the end system is not in the original ARP table, the first ping packet is dropped, and an ARP request is substituted instead. After the station replies, the subsequent pings work.

Figure 12-11 show arp Command Output before Running the ping Command

s2431.gif

Figure 12-12 show arp Command Output after Running the ping Command

s2432.gif

The success of the ping demonstrates that the host can reply to the router. All LAN-related and host configuration problems are now eliminated; however, traffic still is not traversing the router. It is time to examine the router's configuration.

Isolating Router Software Configuration Problems

After eliminating all serial hardware problems, LAN problems, and host configuration problems, a router configuration problem may exist. In fact, there may be more than one problem.

Use the following procedure to isolate router software configuration problems:

Step 1 Use the debug x25 events privileged EXEC command to enable X.25 debugging on the router. Given the situation, the router is likely to immediately report events. Connection attempts appear as call packets; communication problems can cause clear or reset packets for individual circuits or, in more severe cases, restart or diagnostic packets for the X.25 service. The clear, reset and restart packets commonly encode cause and diagnostic codes, and diagnostic packets contain a diagnostic code. See the Debug Command Reference for an explanation of these codes. Call and call confirm packets can encode user facility information, which can also be informative when troubleshooting.
Step 2 Compare the configuration files of the various routers in the WAN with the configuration file for Router-New.

There are a number of configurable X.25 parameters that must match those defined for the WAN connection. These key parameters, which you must get from your X.25 network provider, follow: Note The LAPB parameters must match in order for the WAN connection to work, but the default values are commonly sufficient. These parameters are: LAPB window size (k), LAPB acknowledgment timer (T1), LAPB modulo and LAPB DTE/DCE identity. Similarly, in the postulated setup the X.25 DTE/DCE identity will be DTE, but in other configurations this parameter should be checked.

In this case, assume that the switched virtual circuit channel ranges are not correctly defined in the configuration for Router-New.
The values that define the outgoing-only range (LOC and HOC, the lowest and highest channel respectively), the two-way range (LTC and HTC) and the incoming-only range (LIC and HIC) are all set to the default in Router-New. However, the WAN requires that these be specifically configured. Because of this mismatch, the router is unable to complete any virtual circuits. In Software Release 9.1 and greater, you generally only need to set LTC and HTC.
Fixing these errors allows the router to successfully perform ICMP pings, but regular traffic is still not getting through.

Note The configuration requirement for the LTC in this case is driven by the specification of permanent virtual circuits (PVCs). The PVC channel specifications must be lower than any SVC range. The default is a two-way range between 1 and 1024, so the LTC value must be raised to define any PVCs.

Step 3 Use the write terminal privileged EXEC command to examine the configuration of the router. In this case, the x25 map command does not include the broadcast keyword. Because the IP internetwork uses IGRP (a dynamic routing protocol), the broadcast keyword is required. Figure 12-13 summarizes the changes made to the configuration file that finally allow traffic through the router.

If X.25 payload compression is used for encapsulation traffic, the two encapsulating routers must run Cisco Internetwork Operating System (Cisco IOS) Release 10.2 or later; this feature is not available in earlier versions and can cause problems if the two routers are not configured correctly. The two routers must agree to use X.25 payload compression, either by using a Call User Data (CUD) preamble when establishing an SVC or by configuring compression for both ends of a PVC. Because there is no standard for compressing X.25 data, this feature can only be used to encapsulate traffic between two Cisco routers.
Software releases prior to Cisco IOS Release 10.2 will not recognize the CUD of a received compression call and will, by default, clear the call. The call will be accepted, however, if the interface is configured with a default protocol (using the x25 default command) but no connectivity will result because neither of the two routers will understand the traffic received from the other. Similarly a PVC that is connected to a router that is compressing its encapsulation traffic will not do anything useful.
Cisco IOS Release 10.2 and later will recognize the CUD of a received call (so an interface that configures a default protocol will not accept an unusable call), but will only accept a compression call if the encapsulation map is configured for compression. Both routers must be configured for compression because the feature consumes significant memory and computational resources. An uncompressed call can, however, use a map configured for compression, so connectivity can be established by one station despite mismatched configurations.
In all cases, an encapsulation PVC must be correctly configured on both routers to establish connectivity, because there is no X.25 protocol procedure that can be used to identify the traffic carried.

Problem Solution Summary

Introducing new internetworking systems into LAN-to-WAN internetworks is not a simple matter. The key to resolving multilayered problems is to address each possible problem individually. In this case, multiple causes involved both media problems and software misconfigurations. Connectivity to Site-New was established after making the following changes: Figure 12-13 show the final X.25 configuration that allows traffic to pass through the internetwork. Internetworking problems are rarely one-dimensional. Isolating a problem requires a certain amount of patience and a methodical approach. It is also important to note that subtle protocol variations can wreak havoc in networks if these variations are not fully accounted for during the initial configuration. Thus, it is critical to coordinate efforts with all responsible organizations---especially when third parties, such as WAN service vendors, are involved.

Figure 12-13 Complete X.25 Configuration Showing Changes Needed to Pass Traffic

s3388.gif

Using the show interfaces Command in an X.25 WAN Environment

Depending on the WAN encapsulation (such as X.25, Switched Multimegabit Data Service [SMDS]), or Frame Relay) that is being used, the show interfaces serial EXEC command provides specialized diagnostic information. This section examines the additional diagnostic information provided by the show interfaces serial EXEC command for troubleshooting X.25 WAN connections. For information about the output of the show interfaces serial EXEC command that is pertinent to SMDS and Frame Relay, see the Router Products Configuration Guide and Router Products Command Reference publications.

In addition to the general fields discussed in the section "Developing a Strategy for Isolating Problems" in the "Troubleshooting Overview" chapter, the show interfaces serial output for X.25 internetworks provides additional accounting information that can indicate serial problems. These fields provide the following information:

All but the X.25 restart count are LAPB events; because X.25 requires a stable data link, LAPB problems will commonly cause an X.25 restart event that implicitly clears all virtual connections. If unexplained X.25 restarts occur, examine the underlying LAPB connection for problems.

Figure 12-14 highlights each field in the X.25 version of output from the show interfaces serial EXEC command.

Figure 12-14 Output from the X.25 Version of the show interfaces serial Command

s3387.gif 


Note If any of these fields are increasing and represent more than 0.5 percent of the number of information frames (IFRAMEs), there is probably a problem somewhere in the X.25 network. There should always be at least one SABM; however, if there are more than 10, the packet switch probably is not responding.

Symptom Recorded REJs, RNRs, FRMRs, RESTARTs, or DISCs in excess of 0.5 percent of IFRAMEs

Possible Cause The following causes can result in this symptom:

Recommended Action The following steps are suggested when this symptom is encountered:
Step 1 Enable the debug lapb privileged EXEC command. If the LAPB protocol seems stable, disable the debug lapb command and enable the debug x25 events privileged EXEC command.
Step 2 Look for restarts or RESTART messages or CLEAR REQUESTS with non-zero cause codes.
Step 3 To interpret the X.25 cause and diagnostic codes provided by the output, see the "X.25 Cause and Diagnostic Codes" appendix in the Debug Command Reference manual.
Step 4 Verify that the critical LAPB parameters (modulo, T1, N1, N2 and k) and the critical X.25 parameters (modulo, X.121 address, SVC ranges, default window and packet sizes and PVC definitions) match the parameters required by the WAN connection.
Step 5 Use a serial analyzer to check the hardware at both ends of the link and to determine whether the SABMs are being responded to with unnumbered acknowledge (UA) packets, or to examine any other anomalous protocol event.
Step 6 If the analyzer cannot identify any external problems, check the router hardware.
Step 7 Swap faulty equipment as necessary.

WAN and Serial Line Connectivity Symptoms

The symptom modules in this section pertain to serial and WAN problems. Unless otherwise indicated, each module is presented as a set of general problems applying to all WAN types (such as X.25, point-to-point serial, SMDS, and Frame Relay). Any special considerations for a specific network type are noted.

WAN connectivity symptoms are discussed in the following sections:

Intermittent WAN Connectivity

Symptom: Connections can be made between some nodes, while other nodes cannot connect. Table 12-1 outlines possible causes and suggested actions when intermittent connectivity in serial and WAN interconnections is experienced.

Table 12-1 WAN: Intermittent WAN Connectivity

table.gif

-------------------------------------------------------------------------------------------------------------------
Possible Causes                        Suggested Action                                                              
-------------------------------------------------------------------------------------------------------------------
Faulty interface card or cable          Step 1  Use the show interfaces serial and show controllers EXEC             
                                       commands to check the status of the interface.                                
                                        Step 2  Look for a line down condition and version level.                    
                                        Step 3  Upgrade microcode (firmware) if the current code is older than       
                                       Version 1.7.                                                                  
                                        Step 4  Swap any nonoperational cards or cables.                             
CSU/DSUfailure                          Step 1  Use the show interfaces serial EXEC command to check for             
                                       input errors.                                                                 
                                        Step 2  Replace the modem.                                                   
                                        Step 3  Observe behavior after the modem is changed.                         
Timing problem                          Step 1  Check the CSU/DSU configuration to verify that                       
                                       SCTE/Terminal timing is enabled; enable serial clock transmit                 
                                       external (SCTE)/terminal timing if it is not already enabled.                 
                                        Step 2  If the CSU/DSU is properly configured, or if intermittent            
                                       connectivity persists after enabling SCTE/Terminal timing on                  
                                       the CSU/DSU, verify that the correct network entity is                        
                                       generating the system clock; reconfigure nodes and modems if                  
                                       clocking is not properly configured.                                          
                                        Step 3  If intermittent problems persist, check cable length; if the cable   
                                       is longer than 25 feet (7.62 meters), you might need to invert the            
                                       clock on the MCI/SCI.                                                         
                                        Step 4  Invert the data on the DSU/CSU on both ends of the connection.       
                                        Step 5  Lower the line speed to 56 KB or derivative of that speed.           
                                        Step 6  Check for possible routing loops, or misconfigurations of            
                                       routing protocols.                                                            
Network generating invalid PRs (X.25)   Step 1  Verify that the interface default flow control values match the      
                                       values defined for the switch.                                                
                                        Step 2  Run diagnostics at the switch.                                       
                                        Step 3  Swap switch hardware if necessary.                                   
Router generating invalid PRs (X.25)    Step 1  Verify that the interface default flow control values match the      
                                       values defined for the WAN connection.                                        
                                        Step 2  Enable the debug x25 events EXEC command and examine the             
                                       cause and diagnostic codes. For more information, see the "X.25               
                                       Cause and Diagnostic Codes" appendix in the Debug Command                     
                                       Reference manual.                                                             
Serial line congestion                  Step 1  Adjust the hold queue.                                               
                                        Step 2  Tune buffer sizes. For more information, see the section             
                                       "Adjusting Buffers to Ease Overutilized Serial Links" in the                  
                                       "Troubleshooting Serial Line Problems" chapter.                               
                                        Step 3  Apply a priority list.                                               
                                        Step 4  Reduce broadcast traffic.                                            
-------------------------------------------------------------------------------------------------------------------

WAN Connections Fail as Load Increases

Symptom: Users continually complain about lost connections at peak periods. One example of this problem is in an environment that features bridged DEC local-area transport (LAT) traffic and multiple routed protocols. Data entry input from users (or other application requests) might be getting buffered at the end of an already long input queue; eventually one end of the connection times out. Table 12-2 outlines possible causes and suggested actions when WAN connections fail as load increases.

Table 12-2 WAN: Connections Fail as Load Increases

table.gif

---------------------------------------------------------------------------------------------------------
Possible Causes            Suggested Actions                                                               
---------------------------------------------------------------------------------------------------------
Noisy serial line           Step 1  Determine whether input errors are increasing.                         
                            Step 2  If input errors appear, diagnose the serial line as described in the   
                           section "Special Serial Line Tests" in the "Troubleshooting                     
                           Serial Line Problems" chapter.                                                  
Overutilized serial line    Step 1  If input errors do not appear, there is a congestion problem.          
                            Step 2  Increase the bandwidth.                                                
                            Step 3  Include an appropriate priority queuing configuration statement.       
                            Step 4  Tune buffer sizes. For more information, see the section               
                           "Adjusting Buffers to Ease Overutilized Serial Links" in the                    
                           "Troubleshooting Serial Line Problems" chapter.                                 
                            Step 5  Reduce unnecessary broadcast traffic.                                  
---------------------------------------------------------------------------------------------------------

WAN Connections Fail at a Particular Time of Day

Symptom: This symptom is generally an example of connections dying under load. In this case, traffic on a serial link approaches saturation at specific times during the day: for instance, around 8:30 a.m., noon, and 5:30 p.m. The result is a lost connections or an inability to make connections. Table 12-3 outlines possible causes and suggested actions when connections fail at a particular time of day.

Table 12-3 WAN: Connections Fail at a Particular Time of Day

table.gif

----------------------------------------------------------------------------------------------------------------------
Possible Causes                          Suggested Action                                                               
----------------------------------------------------------------------------------------------------------------------
Overutilized bandwidth                    Step 1  Check the applications that are being run. Look for very large        
                                         file transfers scheduled at particular times of the day.                       
                                          Step 2  If you find large file transfers that are scheduled for the time of   
                                         day at which saturation occurs, set up a priority queue based on               
                                         packet size to allow higher amounts of small-packet traffic. (The              
                                         protocol must support flow control.)                                           
                                          Step 3  Rearrange the timing of file transfers so that links are not          
                                         overused during normal business hours.                                         
                                          Step 4  Add bandwidth and consider dial backup over the new link for          
                                         applications that are taking excessive bandwidth on existing                   
                                         links.                                                                         
Unshielded cable runs are too close to    Step 1  Use the show interfaces serial EXEC command to look for               
electromagnetic interference (EMI)       input errors.                                                                  
sources                                   Step 2  If loading is not the problem, and input errors are being             
                                         registered, inspect cable runs for proximity to EMI sources.                   
                                          Step 3  Relocate or shield cables if they are found to be near EMI            
                                         sources.                                                                       
----------------------------------------------------------------------------------------------------------------------

Connections Fail after a Period of Normal Operation

Symptom: Connections suddenly fail and cannot be restored after relatively normal, error-free operation. Table 12-4 outlines possible causes and suggested actions when connections fail suddenly after a period of normal operation.

Table 12-4 WAN: Connections Fail after Normal Operation

table.gif

-------------------------------------------------------------------------------------------------------------------------
Possible Causes                            Suggested Action                                                                
-------------------------------------------------------------------------------------------------------------------------
Hardware failure somewhere in the serial    Step 1  Use the show interfaces serial EXEC command to determine               
link                                       whether the link is down.                                                       
                                            Step 2  If the link is down, refer to the section "CSU and DSU                 
                                           Loopback Tests" in the "Troubleshooting Serial Line Problems"                   
                                           chapter or use a serial analyzer to troubleshoot the failure.                   
Routing tables are incorrect                Step 1  If the link is up, use the appropriate show protocol route EXEC        
                                           command.                                                                        
                                            Step 2  Determine whether routes are correct; if not, look for the source      
                                           of bad routes, such as a flapping link, a backdoor bridge between               
                                           the routed segments, or an incorrect configuration of route                     
                                           redistribution between routing protocols.                                       
Buffer misses or other software problem     Step 1  If the routing table is correct and the link is up, use the            
                                           show buffers EXEC command to evaluate buffer status.                            
                                            Step 2  Refer to the section "Adjusting Buffers to Ease Overutilized           
                                           Serial Links," in the "Troubleshooting Serial Line Problems"                    
                                           chapter. Modify buffers as necessary to prevent dropped                         
                                           connections.                                                                    
                                            Step 3  Contact your technical support representative if all actions fail to   
                                           resolve the problem.                                                            
-------------------------------------------------------------------------------------------------------------------------

WAN Users Cannot Connect to Resources over a New HDLC Link

Symptom: Traffic does not pass through a newly installed router interconnecting broadcast networks via a High-Level Data Link Control (HDLC) point-to-point link. Table 12-5 outlines possible causes and suggested actions when users cannot connect to resources over a new HDLC link.

Table 12-5 WAN: Users Cannot Connect to Resources over a New HDLC Link

table.gif

---------------------------------------------------------------------------------------------------------------
Possible Causes                       Suggested Action                                                           
---------------------------------------------------------------------------------------------------------------
Link is down                           Step 1  Use the show interfaces serial EXEC command to determine          
                                      whether the link is down.                                                  
                                       Step 2  If the link is down, refer to the "CSU and DSU Loopback Tests"    
                                      section in the "Troubleshooting Serial Line Problems" chapter              
                                      or use a serial analyzer to troubleshoot the failure.                      
Keepalive packets not being received   Step 1  Use the debug serial interface privileged EXEC command to         
                                      determine the status of keepalive packets.                                 
                                       Step 2  If keepalive packets are not incrementing, refer to the section   
                                      "CSU and DSU Loopback Tests" in the "Troubleshooting Serial                
                                      Line Problems" chapter.                                                    
---------------------------------------------------------------------------------------------------------------

WAN Users Cannot Connect to Resources over a New X.25 WAN Link

Symptom: Traffic does not pass through a newly installed router interconnecting broadcast networks via an X.25 WAN. Look for problems associated with the new installation, especially when LANs previously interconnected via the WAN continue to communicate with no disruption of service. Table 12-6 outlines possible causes and suggested actions when users cannot connect to resources over a new X.25 link. 
Note The process of problem isolation for Defense Data Network (DDN) X.25 networks is essentially the same, except for the DDN-defined dynamic mapping capability.

Table 12-6 WAN: Users Cannot Connect to Resources over New X.25 WAN Link

table.gif

------------------------------------------------------------------------------------------------------------------------
Possible Causes                               Suggested Actions                                                           
------------------------------------------------------------------------------------------------------------------------
Link is down                                   Step 1  Use the show interfaces serial EXEC command to determine           
                                              whether the link is down.                                                   
                                               Step 2  If the link is down, refer to the "CSU and DSU Loopback Tests"     
                                              section in the "Troubleshooting Serial Line Problems" chapter.              
Switch is misconfigured                        Step 1  Check the configuration of the switch; look for bad address        
                                              specifications, incorrect VC parameter settings, or other                   
                                              configuration errors.                                                       
                                               Step 2  If you find errors, modify the configuration and use the           
                                              show interfaces serial EXEC command to check the status of                  
                                              the line.                                                                   
Misconfigured router, incorrect cabling, or    Step 1  Use the show interfaces serial EXEC command to determine           
bad router hardware                           the status of the interface. If the interface is up, but the line           
                                              protocol is down, check the Link Access Procedure, Balanced                 
                                              (LAPB) state.                                                               
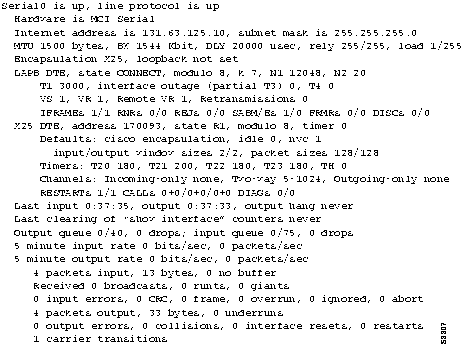
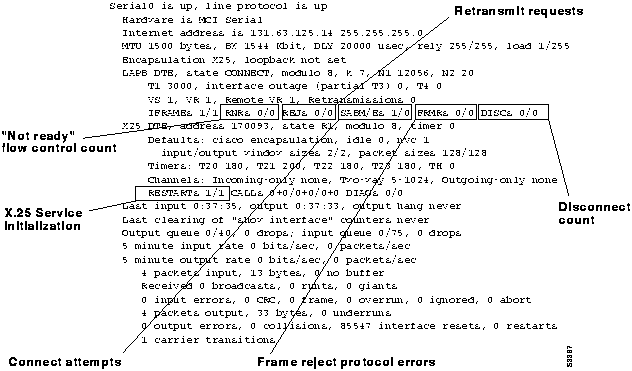
                                               Step 2  If the LAPB state is not CONNECT, attach a serial analyzer.        
                                               Step 3  Use the serial analyzer to look for UA packets sent in reply to    
                                              SABMs.                                                                      
                                              If UAs are not being sent, one of the possible causes described             
                                              in this table is the likely problem.                                        
                                               Step 4  Reconfigure equipment or replace equipment as required.            
                                               Step 5  If the show interfaces serial EXEC command indicates that the      
                                              interface and line protocol are up, but no connections can be               
                                              made, use the write terminal privileged EXEC command to                     
                                              check the router configuration.                                             
                                               Step 6  Look for x25 map interface configuration commands and ensure       
                                              that the correct addresses are specified.                                   
                                               Step 7  If dynamic routing is being used in the network, verify that the   
                                              broadcast keyword is included in the x25 map command.                       
                                               Step 8  Ensure that all router configuration options match switch          
                                              settings.                                                                   
                                               Step 9  Modify router configuration as needed to resume operation.         
------------------------------------------------------------------------------------------------------------------------

WAN Users Cannot Connect to Resources over a New Frame Relay Link

Symptom: Traffic does not pass through a newly installed router interconnecting broadcast networks via a Frame Relay WAN. Look for problems associated with the new installation, especially when LANs previously interconnected via the WAN continue to communicate with no disruption of service. Table 12-7 outlines possible causes and suggested actions when users cannot connect to resources over a new Frame Relay link.

Table 12-7 WAN: Users Cannot Connect to Resources over New Frame Relay Link

table.gif

------------------------------------------------------------------------------------------------------------------------
Possible Causes                            Suggested Actions                                                              
------------------------------------------------------------------------------------------------------------------------
Frame Relay switch is misconfigured         Step 1  Use the show interfaces serial EXEC command to determine              
(dynamic Data Link Connection Identifier   the status of the line and to determine whether Local                          
[DLCI] and protocol address mapping)       Management Interface (LMI) updates are being received.                         
                                            Step 2  If LMI updates have not been received, enable the debug               
                                           frame-relay lmi privileged EXEC command; look for LMI                          
                                           information to determine whether the switch and router are                     
                                           sending and receiving LMI packets.                                             
                                            Step 3  Confirm that the DLCI numbers provided by your vendor match           
                                           the PVC output resulting from the debug frame-relay lmi                        
                                           privileged EXEC command.                                                       
                                            Step 4  Check the configuration of the Frame Relay switch; make sure          
                                           LMI matches the router.                                                        
Router is misconfigured (wrong keepalive    Step 1  Use the write terminal privileged EXEC command to check for           
setting)                                   LMI keepalive setting (dynamic mode). Ten seconds is the                       
                                           default (not displayed).                                                       
                                            Step 2  Compare LMI keepalive setting with the Frame Relay switch             
                                           setting. The LMI keepalive setting should be equal to or less                  
                                           than the Frame Relay switch.                                                   
                                            Step 3  Make sure that the router speed does not match the switch,            
                                           which is normally set 2--5 seconds slower than the router.                     
Misconfigured access list                   Step 1  Evaluate access lists at both ends of the connection.                 
                                            Step 2  Make sure there are no inadvertent access denials.                    
                                            Step 3  Modify access lists as needed or remove to test connectivity.         
Cabling problem                             Step 1  Use the show interfaces serial EXEC command to determine              
                                           the status of the interface.                                                   
                                            Step 2  Check cabling. Refer to the "Developing a Strategy for Isolating      
                                           Problems" section in the "Troubleshooting Overview" chapter.                   
                                            Step 3  Replace any incorrectly configured or failed cables.                  
Failed hardware                             Step 1  Use the show interfaces serial command to determine the status        
                                           of the interface.                                                              
                                           Frame Relay does not support Loop Back, but if Local DSU is                    
                                           placed into Local Loopback, the input packets will equal output                
                                           packets. These packets are the LMI updates the router sends out.               
                                            Step 2  Replace hardware as necessary.                                        
Router is misconfigured (dynamic DLCI       Step 1  Check the output of the show interface serial EXEC command            
and protocol address mapping)              to determine the status of the interface.                                      
                                            Step 2  Determine whether DLCI-to-protocol mapping is dynamic or              
                                           static; set to the correct mode if it is not correct.                          
                                            Step 3  If dynamic mapping is implemented and if the interface and line       
                                           protocol are up, but no connections can be made, examine the                   
                                           output of the show frame-relay map EXEC command.                               
                                            Step 4  Determine whether any of the far end networks have been               
                                           learned by the local router.                                                   
                                            Step 5  If far end networks have been learned and if the protocol             
                                           supports ping, ping the nearest interface of the remote router to              
                                           verify that you can reach that point.                                          
                                            Step 6  If the interface and line protocol are up, and you cannot ping, the   
                                           Frame Relay network is probably misconfigured.                                 
                                            Step 7  If you can ping, ping through to the other side of the router,        
                                           working out to end stations.                                                   
                                            Step 8  Reconfigure equipment as necessary. (At the router, be sure that      
                                           the remote DLCI number is mapped to the protocol address at                    
                                           the far end.)                                                                  
                                            Step 9  If the output of the show frame-relay map EXEC command                
                                           indicates that no far end networks have been learned, enable the               
                                           debug framerelay events EXEC command and run the                               
                                           appropriate show route EXEC command.                                           
                                            Step 10  Identify the exchanges that are occurring between the router and     
                                           the switch and determine whether any routing protocol                          
                                           information is being learned.                                                  
                                            Step 11  Change the router configuration as necessary.                        
Router is misconfigured (static Frame       Step 1  Use the show interfaces serial EXEC command to determine              
Relay address mapping)                     the status of the interface.                                                   
                                            Step 2  Determine whether DLCI-to-protocol mapping is dynamic or              
                                           static; set to correct mode if not correct.                                    
                                            Step 3  If the interface and line protocol are up and if static mapping is    
                                           implemented, but no connections can be made, examine the                       
                                           output of the show frame-relay map EXEC command.                               
                                            Step 4  The status should be active. If not, compare the configurations       
                                           on the switch and the router and make sure they match.                         
                                            Step 5  If the show frame-relay map EXEC command indicates that               
                                           the status is active, examine the output of the show route EXEC                
                                           command for the appropriate protocol to determine whether                      
                                           routing information is accumulating. Misconfigured access lists                
                                           might be a cause.                                                              
                                            Step 6  Make sure BROADCAST tag is set on your map statements if              
                                           your are running a routing protocol.                                           
                                            Step 7  Double-check that the NETWORK ADDRESS and DLCI are set                
                                           correctly in your configuration.                                               
------------------------------------------------------------------------------------------------------------------------

Note You cannot ping the local router's frame-relay interface unless a static map is configured to permit this action.

WAN Users Cannot Connect to Resources over a New SMDS Link

Symptom: No traffic of any kind is passing through a newly installed router interconnecting broadcast networks via an SMDS WAN link. Look for problems associated with the new installation, especially when LANs previously interconnected via the WAN continue to communicate without disrupted service.

If you are having difficulty establishing connections over an SMDS cloud, obtain the following information as a preliminary step before beginning the problem isolation process:

Table 12-8 outlines possible causes and suggested actions when users cannot connect to resources over a new SMDS link.

Table 12-8 WAN: Users Cannot Connect to Resources over New SMDS Link

table.gif

-----------------------------------------------------------------------------------------------------------------
Possible Causes                      Suggested Actions                                                             
-----------------------------------------------------------------------------------------------------------------
SMDS switch is misconfigured          Step 1  Check the router and switch configurations for an address            
                                     mismatch.                                                                     
                                      Step 2  Make sure that the SMDS switch is configured for multicast or        
                                     static mapping (depending on the intended network setup).                     
Router misconfigured (general SMDS)   Step 1  Use the write terminal privileged EXEC command to evaluate           
                                     the configuration of the router.                                              
                                      Step 2  Compare the configuration with requirements for the switch.          
                                     Look for bad address specifications, an incorrect mode                        
                                     specification (multicast versus static), or a missing                         
                                     encapsulation smds interface configuration command.                           
                                      Step 3  Modify the configuration as necessary to make the router match       
                                     SMDS network requirements. Verify that SMDS DXI is enabled                    
                                     or disabled as required by the SDSU.                                          
                                     In Cisco IOS Release 10.0 and later, SMDS DXI is enabled by                   
                                     default.                                                                      
Misconfigured SMDS interface or       Step 1  Use the show arp EXEC command to determine what other                
multicast addresses                  devices, if any, have been detected on the switch.                            
                                      Step 2  If none have been detected, make sure that the SMDS address          
                                     specified in the smds address interface configuration command                 
                                     matches the address of the attached switch.                                   
                                      Step 3  Make sure that the SMDS multicast addresses specified in the         
                                     smds multicast interface configuration command match the                      
                                     addresses configured on the switch.                                           
                                      Step 4  Make sure that the smds enable-arp interface configuration           
                                     command is present so that higher layers learn about the router.              
                                      Step 5  Check the static maps configured on the router. To allow the         
                                     SMDS software to translate a destination address into a proper                
                                     SMDS address for outgoing packets, make sure that static maps                 
                                     are configured for all nonlearning protocols.                                 
                                      Step 6  If SMDS data is still not being received, even when packets are      
                                     being sent, check all connections for physical connectivity.                  
                                      Step 7  If the physical connections are operational, and packets still are   
                                     not being received, check the SDSU configuration.                             
Router misconfigured (static SMDS     Step 1  Use the show interfaces serial EXEC command to determine             
address mapping)                     the status of the interface.                                                  
                                      Step 2  Use the show smds map EXEC command to determine whether              
                                     the mapping mode is multicast or static; reconfigure the mode if              
                                     it is incorrect.                                                              
                                     All network protocols, with the exception of IP and ISO                       
                                     Connectionless Network Service (CLNS), require static                         
                                     mapping from protocol addresses to SMDS addresses.                            
                                      Step 3  If IP or ISO CLNS is being routed, check the multicast group         
                                     specification. Make any necessary address changes.                            
                                      Step 4  If static mapping is implemented, if the interface and line          
                                     protocol are up, and if connections cannot be made, enable the                
                                     debug serial interface privileged EXEC command.                               
                                      Step 5  Based on the debug output, determine whether the correct             
                                     destination address is being used.                                            
                                      Step 6  Make configuration changes as necessary to the mapping, mode,        
                                     or encapsulation specification.                                               
Misconfigured access list             Step 1  See Table 12-7 for suggested actions.                                
Cabling problem                       Step 1  Use the show interfaces serial EXEC command to determine             
                                     the status of the interface.                                                  
                                      Step 2  Check cabling. Refer to the sections "Using the show interfaces      
                                     Command to Troubleshoot Serial Lines" and "Special Serial                     
                                     Line Tests" in the "Troubleshooting Serial Line Problems"                     
                                     chapter.                                                                      
                                      Step 3  Replace any incorrectly configured or failed cables.                 
Failed hardware                       Step 1  Use the show interfaces serial EXEC command to determine             
                                     the status of the interface. To isolate specific problem                      
                                     equipment, perform loopback and ping tests as described in the                
                                     section "CSU and DSU Loopback Tests," and "Using Extended                     
                                     ping Tests to Troubleshoot Serial Lines" in the "Troubleshooting              
                                     Serial Line Problems" chapter.                                                
                                      Step 2  Replace hardware as necessary.                                       
-----------------------------------------------------------------------------------------------------------------

Some Users Cannot Connect to Resources over a WAN

Symptom: Some users or applications are able to reach resources over a serial/WAN link through a router while other users cannot. Table 12-9 outlines possible causes and suggested actions when some users cannot connect to resources over a WAN.

Table 12-9 WAN: Some Users Cannot Connect to Resources over WAN

table.gif

-----------------------------------------------------------------------------------------------------------------
Possible Causes                            Suggested Actions                                                       
-----------------------------------------------------------------------------------------------------------------
Misconfigured access list                   Step 1  See Table 12-7 for suggested actions.                          
Host configuration is not set up to send    Step 1  Verify that the host is configurated to send ARPs.             
ARPs                                        Step 2  Modify as necessary.                                           
Host configuration points at wrong router   Step 1  Check host configuration for default gateway specification.    
                                            Step 2  Modify host configuration as necessary.                        
Discontinuous subnet addressing (IP)        Step 1  Check the network configuration for discontinuous network      
                                           address space assignment.                                               
                                            Step 2  If you find discontinuous network address space assignments,   
                                           use secondary IP addresses to accommodate physical                      
                                           discontinuity.                                                          
-----------------------------------------------------------------------------------------------------------------
Home TOC Prev Next Help Search CIOSearch

 Copyright 1988-1995 © Cisco Systems Inc.
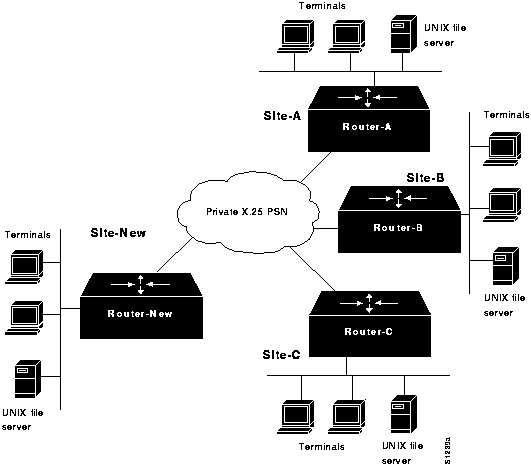